Tuesday, January 29, 2013

Bead Board Nook

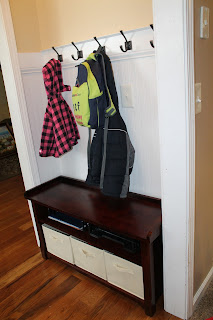
I would love for the title of this to be "Bead board mudroom," but lets face it...  I don't have room for a mud "room."  Honestly, it sounds like something else I would have to clean more than I want to anyway.  My dilemma was finding an easy and organized area for the multiple jackets, book bags and lunchboxes.  They have been left on the floor or piled on some hooks the previous owner screwed into the side of my kitchen island...  lovely.  Just the right height for a toddler to get in and right in the walkway between the island and frig.  Solution:  turn a useless nook into a storage spot for the "get out the door before we miss the bus" stuff.  Here is the before:

I saw a fabulous thing called bead board wallpaper on, where else, pinterest.  I love the bead board look without the thickness of wood.  Plus I didn't want to have to hammer anything.  I used *Riches to Rags* by Dori: Bead Board Wallpaper!!!! as my inspiration and went with a high chair rail look with wide trim.  There is a smaller trim on top to make a narrow shelf.  Add some hooks and it is looking good!

I tossed around the idea of making a built in bench with storage, but again I would need to hammer.  So, a few clicks on Amazon and I found an affordable walnut bench with beige storage cubes that fit the space perfectly.  When I say perfectly, the space is 42 inches and the bench is wedged in the door trim on either side.  It actually makes for a snug fit which means no little people can pull it out and push it over to the pantry so they can reach the snacks.
And with some of the stuff for school...

Now, I LOVE how this turned out!  It wasn't hard, but took some time.  I first prepped the area by removing all the caulk around the floor board and side trim.  Then I lightly sanded the walls.  Next, I applied the wallpaper.  A friend gave me a roll of wallpaper that was not pre-pasted, which seemed like a pain but I honestly have NEVER wallpapered before so who knows if pre-pasted is easier.  (But it sounds easier)  Next, I bought the trim and painted it and the wallpaper once.  Find the wall studs and screw in the trim and caulk the seams.  Then paint a second coat on everything and install the hooks (over the screws so you can't see the heads).  

Saturday, September 8, 2012

Bathroom makeover... copy style.

I have not touched the bathroom in the hallway since we moved in.  It serves as the guest bathroom and the kids' bathroom, although the kids are usually in the master bathroom with us.  So, it just sat there, and sat there, and sat there with a bad pink/yellow paint job and builder blah components.  I finally decided I needed to do something about it and I found some energy.  I knew this would be a task taken on all by myself...  and I did all of it all by myself.  Yep, painting, plumbing, carpentry...  I did it!  This isn't a knock on the hubs, but he just is very practical about this stuff.  If the light comes on and the sink works and toilet flushes then why bother?  Definitely a function over form kinda guy.  So, that being said...  the big reveal.  I didn't take an actual "before" picture...  it is more of a "just got started pic and maybe I will take a picture so I can blog about it or put it on pinterest."  Pinterest, by the way, is where I found my inspiration bathroom.  I pretty much copied this chick's bathroom.  Ok, before (took this with my phone after I pulled down the light)
AHHHH!  The after!  Here's a run down on the changes: Painted (Behr Billowing Clouds), 3 new shelves, cabinet hardware, replaced towel bar with hooks. (Look in the reflection)  I had to patch a giant hole from the towel bars and sand and patch and sand the crap out of it.
New Faucet

New hand towel hook and framed the mirror.  This framed mirror project is all over pinterest and it really is super easy...  even by yourself.

There are still a few odds and ends, like another framed something over the hand towel and something cutesy over the robe hooks...  maybe a 1, 2, and 3.  Ultimately, I still want to tile the floor and get rid of the glass shower door.  That isn't something I can really do a piece at a time.  But it will happen!

Thursday, June 21, 2012

Boys have a pee-nus.

I have been having some interesting conversations with my oldest son, mostly revolving around his private parts.  It surprised me how early baby boys become interested in their penis.  Basically as soon as they have any control over their arms and hands, they are touching themselves.  Seriously, it was difficult at times to even change a diaper.  Now he is 5 and it is still the topic of many of our little exchanges.

A few days ago I noticed him grabbing himself down there, on top of his shorts.  So I ask him if everything is ok down there.
"Yeah, my penis is just stuck to my balls."
"Ok, well fix it then leave it alone."
"How many balls are there?"
"Two"
"Two balls...  I think I had four when I was a little baby."
"I don't think you ever had four."
"Ouch."
"What now?"
"It hurts when you mash them."
"Well, don't do that then."
"Why does it hurt when you mash them?"
"I don't know.  I don't have them, you will have to ask your dad."

Then Josh chimes in:
"Daddy has a pee-nus, Alex has pee-nus and I have pee-nus.  We are boys.  Mommy doesn't have pee-nus and Ashley doesn't have pee-nus.  They are girls."
"Yes, Josh, that is correct."

At the pool Alex says "Mommy the water is cold."
Me "It is not that cold."
"Yes it is, get your penis in...  it is cold."
"I don't have a penis, you know that."
"Well, put the part that doesn't have a penis in the water.  It is cold."


Sunday, June 10, 2012

Cooking with Pinterest.

So, it has been forever (November to be exact) since I posted anything.  I actually have several things I wanted to write about and post but just haven't done it.  I could give all the good excuses about having 3 kids and volunteering at VBS, but really I just don't like to write b/c I am so bad at it.  I like to give a little more than a one line blurb on Facebook though when I do make something I like.  Anywho, this morning I had nothing good to make for breakfast.  No eggs means no pancakes or homemade anything, because you know how I love to make things from scratch.  I did have a can of pillsbury biscuits and I remembered a FB post of a friend who made doughnuts out of them.  I went to handy dandy pinterest and voila...  lots of pins on how to do this.  So easy... basically cut a hole in the biscuit.  Don't have anything small and round?  Use the cap off a water bottle or 2 liter.  Heat some veggie oil in a pan to medium and fry these bad boys about a minute on each side.  (Mine look a little dark and I could have turned them earlier, but they tasted just fine.)  Let them cool, and dip them in melted butter and then a sugar/cinnamon mixture.  Delicious and extra sugary doughnuts!

Only four because Josh didn't want his dipped in sugar, so he ate his plain.  Weirdo.


 I take these pics on my phone and saw a few other things I have done recently... one not so successful.  But
the kids don't know how it is supposed to look so all is good.  Again, not having the desired lunch of corndogs, I saw some homemade ones on pinterest.  They were from Martha Stewart and my eyes glazed over before getting through the ingredients list.  Cornmeal, salt, sugar...  blah, blah, blah.  I can just use a box mix right?  No need to pile up dry ingredients and make a well in which to crack the egg and knead by hand.  Puh-leeze!  Weeeeeellllll, the box mix was runny, so I used 2 mixes but half the eggs and milk.  It still ran off the hotdog...  but in my defense, even the Martha's direction said to cook about 5 minutes and spoon the cornbread mixture back on the hotdog.  Whatever, this was becoming all too complicated.  I bet you can't wait to see how they turned out, huh?
The cornbread kind of rose around the hotdog in a bun like fashion, so really they turned out ok.  They actually tasted very good...  not chewy at all like the frozen microwaveable kind.  Josh (again with the bread obsession) ate off the cornbread and took a few bites of the hotdog.  Alex, my champion eater, ate the whole thing and asked for a second one.

Tuesday, November 22, 2011

What I stay up late doing.

Like most moms of babies, I pretty much operate in a constant state of sleep deprivation.  What I should do on the rare night I have a little extra time is go to bed.  That isn't what happens though...  this is.  Two of these items are ideas from pinterest.  My friend has a picture folder on facebook called "Pinterest made me do it."  That is exactly what happens.  Your head gets filled with a thousand ideas and you just can't sleep until you try one.
Turkey ribbon sculpture hair clip for Turkey Day.  
Fixed a hole in Alex's jeans so he can still wear them.  I can't figure out why this picture keeps turning sideways...  frustrating.
Another pair of shoes for Ashley.  She needed some brown ones.

Saturday, October 29, 2011

Itsy Bitsy Spider.

I made Ashley a Halloween Dress.  I wasn't really planning to make her a dress so I didn't have a pattern.  I just made one and winged it.  There are a few imperfections, but overall I think it is really cute.  I totally copied the idea from a friend's photo on facebook.  This dress is fully lined and could be reversible if I had used a nice fabric for the "inside."  It was kind of a test project on doing a lining/reversible dress.  I need to buy more patterns when they are on sale at Hobby Lobby for times like this.
 My sweet girl with matching shoes and a black hair bow.
A black pair of shoes I made, too.  I put grippy fabric on the bottom of the green shoes b/c Ashley likes to stand up and the fabric ones slip and make her mad.
I made a few hair bows, too.  These are colors I doubt she will wear...  orange and white or garnet and gold with footballs.  Anyone want these?

Thursday, September 29, 2011

She's crafty.

I have been in a creative mood this week.  The cleaning may be suffering, but I did two little projects.  First one is pinterest inspired.  Burlap in all forms seems pretty popular.  I have a friend who put burlap panels in her den windows about 10 years ago.  Needless to say, she is way ahead of the trends...  very stylish lady!  I am kinda on the fence about how much I like this burlap wreath.  I tied a red tulle (that's all I had on hand) bow to hang it, but it may need something else.  A big "T" or some fall flowers maybe?  I don't know...  I am a copier, not a thinker upper.  It did turn out just like the pic of the one here.  Super easy, but I have way too much burlap left over and it makes a mess when you are cutting it.
My second project I am pretty proud of, if I do say so myself.  I have never taken an art class, but I have been a couple time to those painting/drinking events.  I think that made me less intimidated of a blank canvas.  I bought 2 small canvases and some acrylic paint to make something for Ashley's room.  I took my inspiration from her bedding set and painted these two side by side masterpieces.  This is totally freehand, no stencil or tracing. 
 Below is the quilt, which I pretty much copied with paint instead of fabric.