
I saw a fabulous thing called bead board wallpaper on, where else, pinterest. I love the bead board look without the thickness of wood. Plus I didn't want to have to hammer anything. I used *Riches to Rags* by Dori: Bead Board Wallpaper!!!! as my inspiration and went with a high chair rail look with wide trim. There is a smaller trim on top to make a narrow shelf. Add some hooks and it is looking good!

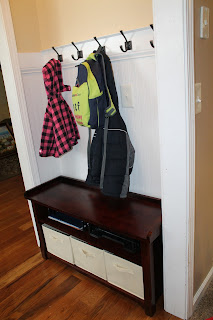
I tossed around the idea of making a built in bench with storage, but again I would need to hammer. So, a few clicks on Amazon and I found an affordable walnut bench with beige storage cubes that fit the space perfectly. When I say perfectly, the space is 42 inches and the bench is wedged in the door trim on either side. It actually makes for a snug fit which means no little people can pull it out and push it over to the pantry so they can reach the snacks.


I tossed around the idea of making a built in bench with storage, but again I would need to hammer. So, a few clicks on Amazon and I found an affordable walnut bench with beige storage cubes that fit the space perfectly. When I say perfectly, the space is 42 inches and the bench is wedged in the door trim on either side. It actually makes for a snug fit which means no little people can pull it out and push it over to the pantry so they can reach the snacks.

And with some of the stuff for school...

Now, I LOVE how this turned out! It wasn't hard, but took some time. I first prepped the area by removing all the caulk around the floor board and side trim. Then I lightly sanded the walls. Next, I applied the wallpaper. A friend gave me a roll of wallpaper that was not pre-pasted, which seemed like a pain but I honestly have NEVER wallpapered before so who knows if pre-pasted is easier. (But it sounds easier) Next, I bought the trim and painted it and the wallpaper once. Find the wall studs and screw in the trim and caulk the seams. Then paint a second coat on everything and install the hooks (over the screws so you can't see the heads).